So you want to build a retaining wall and you’re researching geogrid? That’s good, because geogrid is a fantastic tool that will make your retaining wall much more robust. This article focuses on small block retaining walls typical of DIY residential retaining wall projects that a lot of homeowners build. These blocks don’t require equipment to move and can be hand placed.
Contents hide
1 When Should I Use Geogrid In A Retaining Wall?
1.1 I Don’t Need An Engineer! Now What?
1.2 Drainage
2 How Do I Install Geogrid In A Retaining Wall?
There are two main types of retaining wall – gravity retaining walls and reinforced retaining walls.
A gravity retaining wall is a retaining wall that relies solely on the mass of the retaining wall blocks to hold back the retained soil. Quite rare for small block retaining walls – only the shortest of walls should be built as a gravity wall when using small blocks.
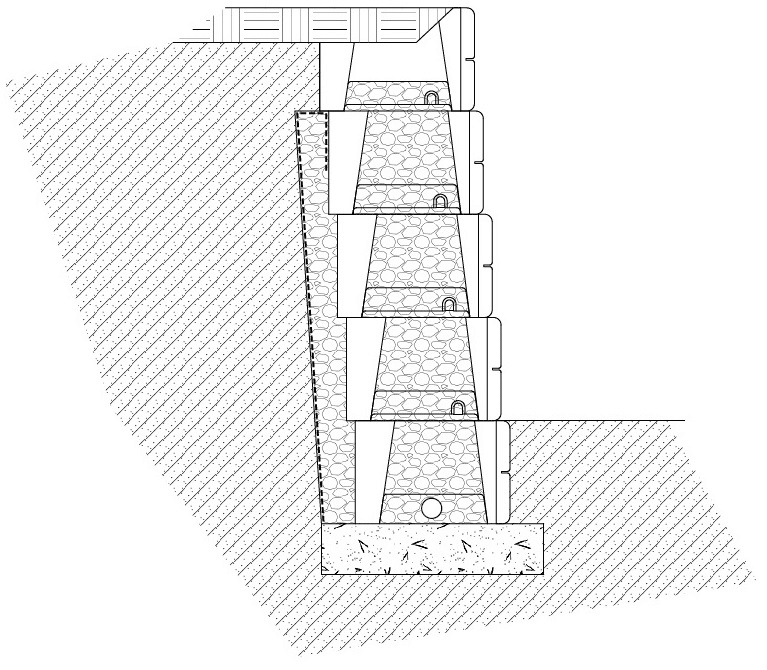
“Gravity” Retaining Wall Example Design Cross Section
In this article we will be focusing on reinforced retaining walls. A reinforced retaining wall is a retaining wall that relies on both the mass of the retaining wall blocks and the geogrid that is installed behind them. If you’re not sure what geogrid is or how it works (in a retaining wall or otherwise), check out this article to brush up.
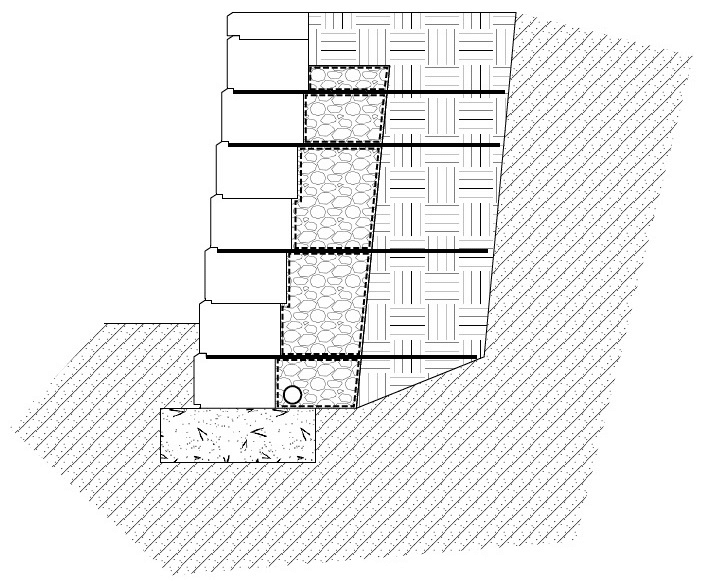
“Reinforced” Retaining Wall Example Design Cross Section
Reinforced small block retaining walls can be engineered to be very robust – geogrid is extremely important to the strength of reinforced retaining walls!
When Should I Use Geogrid In A Retaining Wall?
The best person to answer this is a geotechnical engineer familiar with the many different site conditions that might be present on your property. While this isn’t exactly helpful if you’re looking to DIY – don’t worry. We’ll still give you some guidance in this article.
Depending on where you live, your governing body will have rules regarding retaining wall heights and the maximum height you can build without having an engineer involved. In Calgary, any retaining wall over 1.2 m needs to be designed by an engineer.
If you’re not sure what the rules are where you live you can find out by calling your local permitting office or by calling a local geotechnical engineer or retaining wall builder. Once you’ve got them on the line, briefly explain your project to them and let them know the maximum wall height you’re planning on building. At Factor, we are happy to help homeowners and DIYers over the phone for questions like this (free of charge of course!)
If your wall is taller than the maximum allowed height, you’ll either need to hire an engineer, or you’ll need to change up your plans.
I Don’t Need An Engineer! Now What?
Since your wall is short enough that you don’t need an engineer you can use a rough rule of thumb for geogrid length in your wall.
Geogrid Length = 0.8 x Retaining Wall Height
So if your wall is 5 feet tall you’ll want 4 foot long geogrid layers. For small block walls, geogrid is typically installed every second block layer, starting from the top of the bottom block.
Just be aware that different types of blocks have different requirements and the recommendations given here may not be applicable to every situation and block type. You should check with the block manufacturer’s recommendations for geogrid lengths.
Drainage
I know this article is about geogrid, which doesn’t really have anything to do with drainage… but your geogrid layers are going to interfere with your drainage blanket.. and installing the drainage blanket is a total pain with geogrid.
In case you don’t know what a drainage blanket is – it is a 300 mm (1′) thick layer of washed gravel completely wrapped in geotextile filter fabric installed directly behind your retaining wall blocks. The drainage blanket is very important for the performance of your wall – it prevents the build up of excess water pressure caused by rain, groundwater, snowmelt, irrigation, etc. Excess water pressure on your wall can cause a whole bunch of problems, including complete failure.
In this image (same as the one at the start of this article), you can see the individually wrapped sections of drainage blanket being intersected by the geogrid layers.
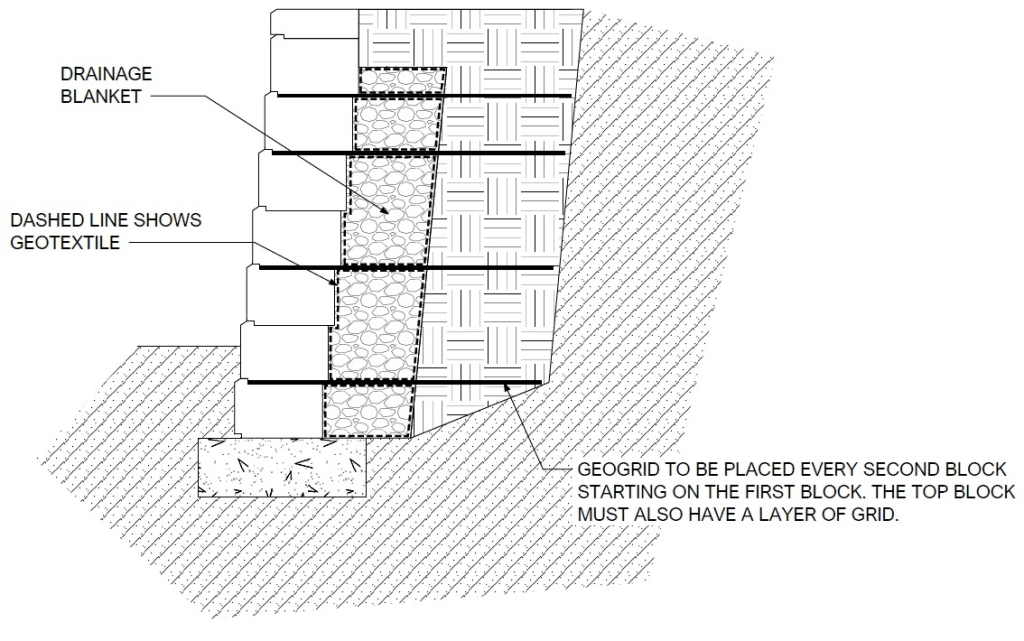
Drainage Blanket Sections Individually Wrapped at Geogrid Intersections
How Do I Install Geogrid In A Retaining Wall?
Assuming you have completed the very important first steps to building a retaining wall (excavated organic materials under the wall alignment and built a smooth, compacted gravel levelling pad), you are ready to place your first layer of blocks.
Making sure your first layer of blocks is level and has been sufficiently backfilled on the front side of the wall (200 mm or 8 inches is usually good for walls under 1.2 m) you can begin the installation as follows:
- Build your first section of drainage blanket
- Place backfill behind the wall to the height of the first block and to at least the length of the geogrid you will install Geogrid Length = 0.8 x Retaining Wall Height
- Once the backfill is sufficiently compacted and is the same height as the first block layer, lay the geogrid on the first block layer
- The edge of the geogrid on the lower block should be placed as far forward on the lower block as possible without sticking out of the face of the wall (you shouldn’t be able to see it once you’ve built the wall).
- If you’ve bought biaxial geogrid (a.k.a two way geogrid), you can just roll it out along the length of the wall, assuming the roll width is wide enough to satisfy the Geogrid Length equation.
- If you’ve bought uniaxial geogrid (a.k.a one way geogrid) you will have to cut it to the length you need and lay it so that the thick or stiff strands in the geogrid are perpendicular to the wall (going into the blocks).
- Once you’ve covered the entire first block layer with geogrid of the correct length, you can now place the second block layer to pin the grid in place.
- With the grid pinned in place by the second row of blocks, carefully begin building your next drainage blanker completely wrapped in geotextile and adding backfill on top of the grid, making sure that the grid stays tight
- Compact the backfill in place
- Add the third row of blocks
- Place backfill and compact in place to the height of block row 3
- Place geogrid on the third row of blocks the same as you did in Step 1/2/3
- Continue until you’ve reached your wall height, remembering to compact every backfill layer, building your drainage blanket, and placing geogrid on every second layer